• Arcade Repair & Restoration Logs
  • Blog purpose
  • Items for sale
Chupnet

Author Archives: Chupperson

Joust repair log

August 14, 2021 3:53 pm / Leave a Comment / Chupperson
finished Joust restoration

From 2017 to early 2020, I was repairing a Joust cabinet that we had acquired from a rural area. The person who sold it to us claimed that it had been in a hotel lobby for years. They also claimed that it had been “working like a champ” up until we came to see it. Regardless, it was a good price even if it was not running, so we gladly picked it up.
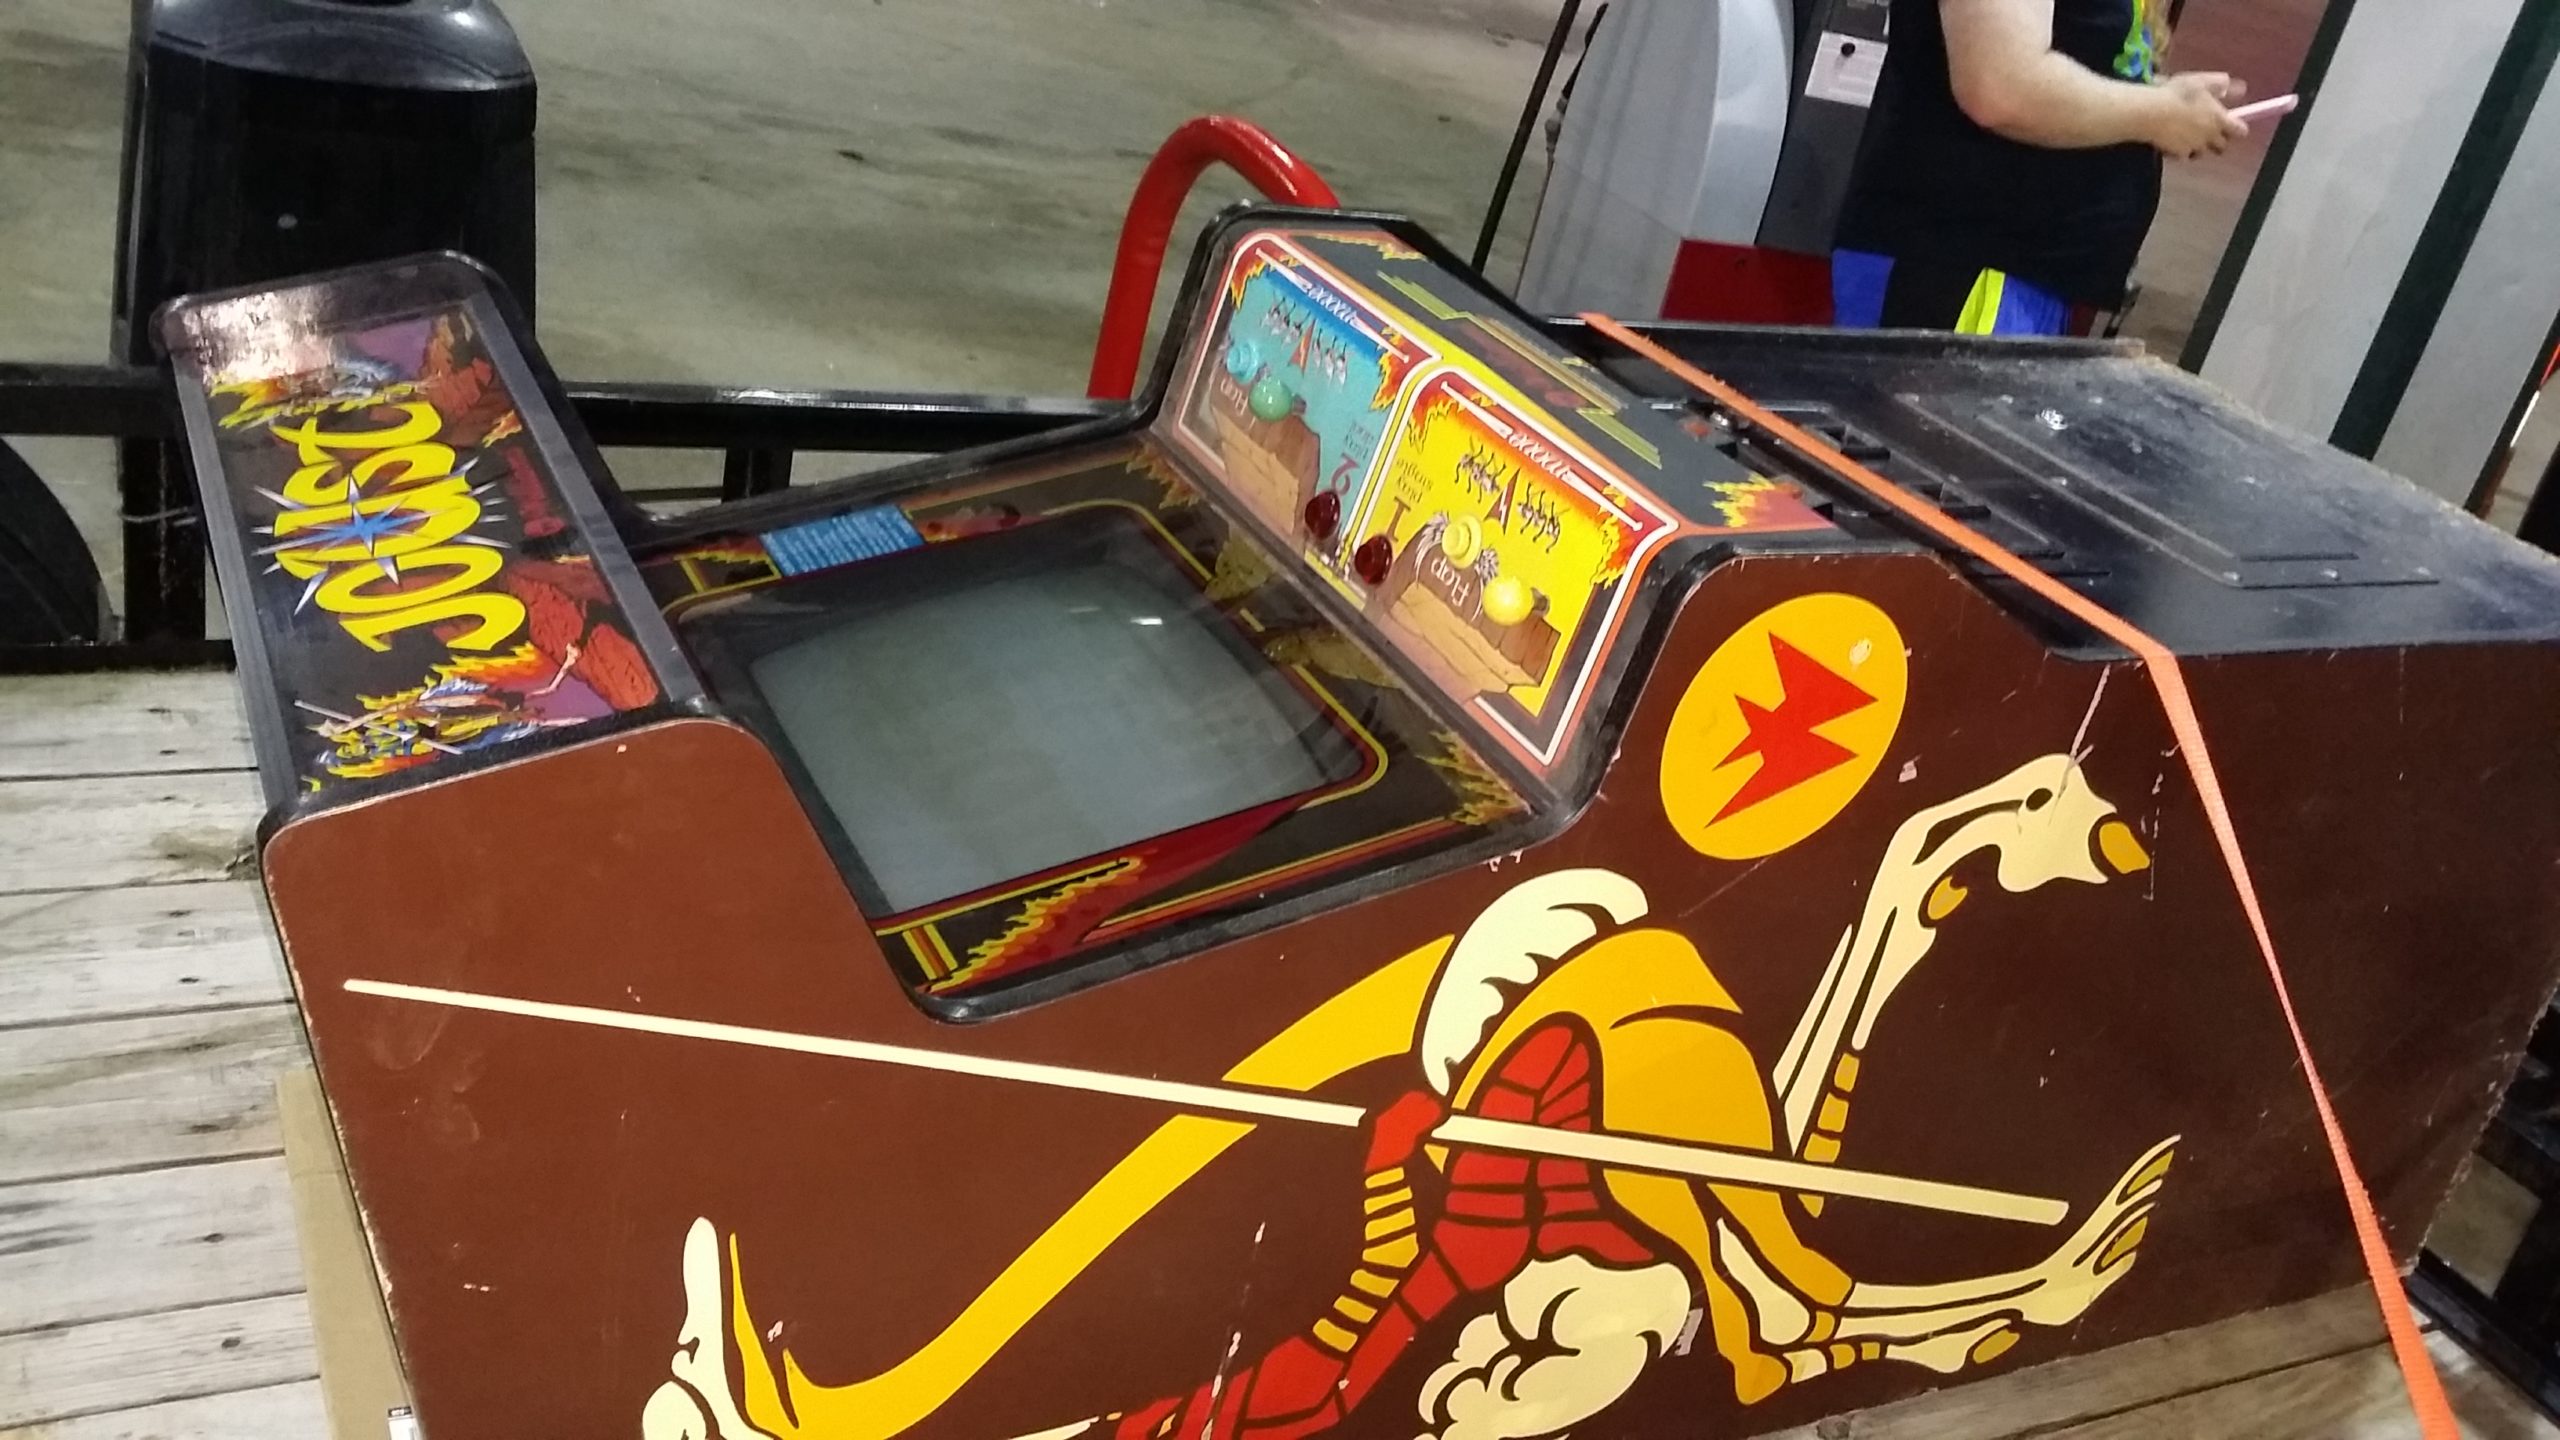
Joust cabinet strapped to a trailer bed

When I got it home, I began to understand the severity of the project I was about to undertake. The back door (the portion behind the monitor) was missing and someone had removed the safety interlock switch, choosing to wire the connections together to defeat the mechanism. A very odd decision, since the interlock switch has a bypass position anyway (just pull the switch outward and it locks in the “on” position.)
interior of cabinet showing hacked wiring

More confusingly, large traces for the bridge rectifier had been removed from the power supply board and replaced with heavy gauge wiring on the opposite side of the board. The power still flows as intended, but it’s very strange. I can only assume that it overheated and damaged the traces to such an extent that the person involved in this “repair” deemed it the only way forward.
damaged traces on power supply boardthick wires soldered to underside of power supply board
The connectors from the transformer had also been very badly redone at some point and needed to be replaced as soon as possible. Some of the original connectors were still present but had been burnt due to their poor design. The original connectors all have round pins, which provide very little surface area to contact with their connectors. This causes the connector to heat up because it’s forcing so much electricity through such a small space. Heating causes oxidation of the metal, which causes resistance, which causes more heat since it’s now even harder to get the electricity where it’s supposed to go, and soon you end up with blackened connectors like this.
connector on power board with burnt pinspoorly done wiring connector

The other circuit boards were not faring much better. The flip-flop chip on the ROM board had been physically broken and some of the ROMs had their labels scraped back.
Joust ROM board with broken flip-flop chip

While I waited for a new flip-flop and other parts to arrive, my dad helped me cut out new back doors for this Joust and for another Joust cabinet that had been turned into a single-slot Neo Geo machine. I painted them and got new locks so they would be ready to install.
two back doors for Joust cabinetsJoust back door with lockback of Joust cabinet with door installed

When the parts showed up, I started by reworking the power supply board first. Gone are the makeshift parts and bulging capacitors, now replaced with fresh, quality parts. All of the pin connectors have been replaced with new square pins that provide much more surface area to conduct with, so they will last a much longer time than the old round ones.
Joust power board with bridge rectifier removedpower supply board with bulging capacitorsfreshly reworked power supply board

The replacement flip-flop for the ROM board showed up in this extremely large box, which I found amusing.
cardboard boxflip-flop chip in antistatic bag

I replaced the broken flip-flop and installed the repaired boards into the machine.
broken chip on ROM boardROM board with chip replaced

I tried booting the machine, and lo and behold, it worked!
Joust machine booting

I got to work cleaning the cabinet up, starting with the monitor glass. I found the original amusement license taped to the back.
back of monitor glassamusement license taped to back of glassamusement license expiring in 1984Joust monitor glass

In order to get the settings and high scores to save, I had to replace the old corroded AA battery holder with a new CR2032 battery holder and perform a small wiring hack to get it to power the SRAM. I also had to clean up some corrosion from the AA battery leakage that had occurred in ages past.
AA battery holder on main boardmain board with battery holder removedwatch battery holder installed on main board

I needed a new fluorescent tube for the marquee, and I discovered that while I had the marquee plex removed, a house lizard had found its way in. Better keep that covered.
lizard inside marquee cavity

One annoying thing that kept happening during my repairs was a persistent “RAM Error 21” that wouldn’t go away no matter what I tried. I replaced the RAM chip in the reported location and replaced its socket, but to no avail.
RAM chip removed on main board

Another persistent problem with this game was its monitor. At first, I wasn’t sure what was causing this problem, but after a while I realized that it needed new capacitors. What I was seeing was the top line of the display (which should ideally be offscreen, since it’s actually game data and not graphics) was folding over, overlapping onto the part of the screen that’s supposed to be visible. Foldover happens sometimes when capacitors in the monitor are old and out of spec, causing the electron beam to be projected incorrectly.
Joust screen with bad graphics at the top
One cool thing about Williams games of this era is that they have a little metal mirror you can use to adjust the monitor. The monitor slides back out of the cabinet and you can then use this to see while performing your calibration.
adjusting Joust monitor in mirrorJoust monitor in adjustment position

There’s also an abandoned wasp nest under this monitor. Where were they keeping this thing?
wasp nest under monitor

The replacement safety interlock came in, so I replaced it as well. Now it functions as it should.
safety interlock switch

When moving this cabinet around, I could hear coins rattling around. I didn’t have the coin door key so I unscrewed all of the bolts from the inside and found about $20 in cash. Not a bad rebate!
coin doorcoins in bucket

I also got some very nice directional LEDs from a pinball lighting supply to really bring out the start buttons.
two LED lightsglowing start buttons

Now for the big problem with this game. The RAM error I mentioned earlier had never gone away, and whatever was causing it was also causing random crashes and glitches while playing. Lots of pieces of player and enemy graphics were being left on screen while the rest of the graphics moved; sometimes strange outlines would be left on screen or the platform graphics would start to erode from enemy graphics being mistakenly superimposed there and then moved away but not refreshed.
Joust screen with graphical glitchJoust screen with graphical glitchJoust screen with graphical glitchJoust screen with graphical glitchgame screen with error

It also caused some fairly amusing errors when the settings failed to be saved when the game crashed.
joust bookkeeping totals screen but all numbers are 666666joust game adjustments screen with glitches

Since there wasn’t anything wrong with the RAM chips themselves, I knew the problem had to be somewhere else in the machine. Through a tedious process of elimination, I determined that something was wrong with the ROM board. I also have a Robotron machine to test with, and it has the same hardware as Joust. I tried moving the Joust ROMs onto the Robotron ROM board and ran it in the Joust machine, and there were no errors. (Oddly, the Joust ROM board worked fine in Robotron as well, but there must be something wrong that just doesn’t affect the Robotron game program.)

I eventually tried replacing nearly every chip and component on the ROM board that could have had an effect on this problem, with no luck. No matter what, the errors remained. I even heard the processor on the sound board might be responsible, so I socketed it and tried replacing it as well.
chips on ROM boardROM board with chip removed

Finally, I decided to cut my losses and found a replacement ROM board on eBay. This one needs its 40-pin ribbon cable connector replaced but has so far given me no problems at all. The game now works fully!
holding replacement ROM board in front of old ROM boardROM board and new ribbon cable connectornew ROM board with new pin connectorsscreen reading "all systems go"

With that finally out of the way, I finally took the time to recap the monitor. The model in this Joust is a Wells-Gardner 19K4901. This was a little tricky because in order to disassemble it, you have to disconnect this black ground wire from the chassis, and it’s soldered to a spring on the tube. The best thing to do is just cut it and then crimp a quick disconnect to it when you’re ready to install it back in the frame.
Joust monitor chassisJoust monitor chassis sitting on tablebottom of Joust monitor circuit boardJoust monitor board reinstalled

The game was now in fully working condition.
During all of this at some point I had also cleaned the control panel with Armor-All to remove all of the tobacco tar that was built up on it. I didn’t feel like replacing the entire CPO since most of the area with art still looked fine. I took some black duct tape and overlaid it on the black areas with the worst ash burns.

The last thing to do was to repair the terribly damaged bottom section of the cabinet. For some unknown reason, this cab, like many others, had at some point had its feet removed. This left it sitting on exposed plywood, since any runners that may have been stapled to the bottom were also long gone.
To start out, I cleaned the wood off as much as possible, and tried to use some wood hardener to stiffen what was left. That didn’t work as well as I wanted, but it was enough to go ahead and start filling in the gaps with some Plastic Wood. I like this stuff a lot. It’s easy to work with and can be used to rebuild wood in layers. Just add some, sand it flat, and add more to build up the missing parts of the wood.
repaired section of woodrepaired section of woodrepaired section of wood

I also had to clamp the wood while it was hardening in order to make it straight again. Years of sitting had made it start to curl inward. The front MDF panel was swollen from contact with water on the floor at some point as well so I added more wood hardener to it and clamped it down.
clamps on woodbottom of Joust cabinet

I filled in whatever other gaps I needed to and prepared to mask it off for painting.
damaged section of woodrepaired section of wood
repaired section of woodrepaired section of wood

I found paint codes for Joust that were very close to the original, and had Lowe’s make up some brown paint which I then rolled on after masking the original art. I did some small touch-ups after that. It isn’t like new, but it doesn’t need to be.
Right side:
joust side art with partially masked stencilfully masked and partially painted sideright side finished product

Left side:
left side art partially maskedleft side art fully painted

Back:
back of cabinet before paintingback of cabinet after painting

After that, I had some 3/4″ metal channeling I had cut to shape and painted black, to imitate the original plastic runners that had been stapled to the bottom.
metal channeling painted black

I hammered them in place with a mallet.
bottom of cabinet sidebottom of cabinet with no feetbottom of cabinet with metal channeling in place

Finally, I added teflon leg levelers so it would be easy to slide around on the floor.
bottom of cabinet with feet

After that, it was time to set it upright and enjoy!
finished Joust restoration

Posted in: Arcade / Tagged: arcade, arcade game restoration, arcade repair, joust

Dream 5.30.20

May 30, 2020 10:00 am / Leave a Comment / Chupperson

Dreamed that as I was going to bed, I saw a mouse, so I cornered him and grabbed him with my hand. He had weird little sparrow wings and after I petted him he calmed down but his limbs started to stretch and mutate, Tetsuo-style. I put him in a paper sack and found that there were two other mice downstairs, along with other weird creatures like 16-legged mouse-shaped insects and little beetles that looked like pineapples. As I attempted to clean this mess up, emergency alarms blared in my ears and I wondered if a tornado was coming.

Posted in: Uncategorized

Japan 2019 days 2-4

September 8, 2019 9:17 am / Leave a Comment / Chupperson

Day 2 started off with an early train to Kyoto. I was oddly queasy on the Shinkansen, unlike during my previous trip. When we arrived, we got on the bus to see the Kinkakuji, known less well in English as the Golden Pavilion. There’s a lot to write about it but the structure that exists now is impressively gold and sits in a very nice area just behind some regular-looking shops and houses.

Kinkakuji rear view

Also, the old dude directing pedestrians outside had a rad goatee and ponytail.After we were done appreciating the craftsmanship, we grabbed some Hรคagen-Dazs from the vending machine near the exit and walked back to the bus.
Creepy top hat guys in the subway station for extra atmosphere.

Howdy

Next we were off to the Kyoto Pokรฉmon Center to get some necessary Slowpoke items. I saw some rad buildings on the way.

These also existed:

Near the Pokรฉmon Center, Sammy Davis Jr. was there to sell us some men’s whisky.

In our attempt to get back to Kyoto station, a series of miscalculations by my phone led us in the opposite direction and we ended up at the gigantic Higashi-Honganji Buddhist Temple which was awesomely free of charge to enter. I was super impressed at the intricacy of design and their determination to build the temple 4 times after each previous construction caught fire and burned down. I bought a book to learn more about it.

It even has an awesome underground theater room to tell you about the restoration and rebuilding of the temple.

After we checked into our guest house, we needed some food so we had a nice walk to Que Pasa, which I had heard had the best burritos in town and they did not disappoint.

They even had vegetarian and vegan options available and were easily on par with anything in the US. I’m sure we will visit there whenever we come to Kyoto.

On day 3 we were on our way to the southwest end of Kyushu to Kumamoto, to visit someone who did a homestay with us last year. It was a long 3 hour trip from Kyoto but I felt less nauseous than the day before. Kumamon is everywhere.We visited the outer grounds of Kumamoto Castle, still under repairs from the 2016 Kumamoto earthquake.

We were able to walk around and see the cranes and scaffolding well as the cracks in the walls resulting from the quake. I’ll have to go back when the repairs are finished. There’s a grand unveiling next month for the castle but I can’t imagine people will be able to visit the inside yet.
We visited a museum and a shopping area near the castle, and as we were leaving we noticed a museum about the history of the castle. Intrigued, we looked around and while we were inside a massive thunderstorm started outside. We bought umbrellas but still had to wait 20 or 30 minutes to be able to start moving in the torrent.We stopped into a game center where I played a round of Mario Kart and then we went to a Tsutaya where I got a Tempalay CD I had been wanting.

After that, we went to the very cool Ninja Restaurant. Down the long stairwell into a door that seemed to swing open by itself, we were ushered in and sat in a booth with a screen that was lowered every time the ninja waitress left. Let me talk about something really great in Japan. Everywhere you go, there’s mood music. In a mysterious ninja restaurant, coming from the streetlamps in Tokyo, in the bottom of a stone mine museum, there’s always the proper musical accompaniment instead of silence or piped-in pop music, and I really appreciate that. In this case, the music was something you would probably find in a pseudo-historical Japanese TV show or video game about ninjas.

On day 4, we went to Suizenji Jojuen, a gorgeous traditional landscape pond in Kumamoto. It was very hot but worth the trip since the landscape was amazing.

After that we said our goodbyes and moved onto our next objective which was to cross under the ocean at the Kanmon tunnel footpath between Kyushu and Honshu. And we would have made it there too, if not for our camera somehow getting left on the train when we got off near the tunnel. Half an hour later, we got word that the camera would be in the lost and found office at Shin-Osaka Station. Having not much time to lose, we opted to put the Kanmon tunnel on our to-do list for next time.

After reclaiming our camera, we headed to Dotonbori to check out the Glico sign.

Not sure why Spider-man is selling Kobe beef.

Mega Don Quijote!

There we go.

The night of day 4 we checked into another Hotel Nine Hours capsule hotel in Osaka’s Nanba area. In the locker room there was a guy carefully arranging dozens of packed food items (and nothing else) into a suitcase. Exhausted, I went to bed.

Posted in: Uncategorized

Japan 2019 day 1

September 2, 2019 5:29 pm / Leave a Comment / Chupperson

We got to Tokyo around 4:30 PM and immediately proceeded with festivities

Popped into Lawson to get tickets for the Mass of the Fermenting Dregs concert this Saturday. Extremely excited to finally see them live.

Then we went to our hotel. Never stayed in a capsule hotel before but it was super chill and it had an amazing shower. There were lockers to keep luggage in and all you had to do to open them was scan the QR code on your “room key” (which incidentally was not required to open your capsule.)

The bed and pillow were a little hard but surprisingly I’m less sore than when I sleep in my own bed. Maybe that’s a sign I need a stiffer bed at home.

Other than someone quietly, maniacally giggling every couple minutes when I was trying to sleep around 10PM, it was an extremely relaxing stay.

Now we’re on the Shinkansen to Kyoto for the first leg of our journey.


Posted in: Uncategorized

Dream 8.31.19

August 31, 2019 8:27 am / Leave a Comment / Chupperson

Dreamed I was in a vast countryside/farm area. I knew from reading a report from the future that a small dog was angry with me and would pick up a large chunk of concrete, stand on my car, and fling it into my windows. A car-sized meteor hit the ground and bounced slightly, leaving a large impression. I put the dog in my car with a now dented passenger window and went to look for the meteor. When I found the meteor, the area rapidly became midtown and I was having a hard time parking. The meteor had been built into an alcove on the outside of someone’s house with a chair and a fountain.

Posted in: Uncategorized

Space Invaders Deluxe Repair Log

June 3, 2019 11:28 pm / 1 Comment / Chupperson

This repair has been in the works for about two and a half years. It was stopped variously by lack of knowledge, lack of proper tools, and lack of time, but eventually repairs were completed and the game is fully functional.

When I started working on it, of course the first thing I had to do was replace the original AC plug end with one that hadn’t had its ground pin removed. Old arcade ops seem to have been very bad about removing them. After that, I also had to switch out the fuse block because the original was so corroded and soft, I’m sure it wouldn’t have done its job much longer.

When I turned the game on, it emitted an explosion sound followed by an earth-shaking hum. I believe this was due to a shorted tantalum capacitor on the sound board.

This dark blue one in the center looks especially suspect.

I replaced all the tantalum caps and the hum disappeared, but the game still showed no signs of life.

I did get this very cool picture though.

I tried a cap kit on the monitor, partially due to age and condition, but partially to see if that was why I wasn’t getting any video.

This board attaches to the rest of the monitor chassis via this unusual array of pin connectors all around the perimeter.
The anode cap also was in some severe need of cleaning before the rubber got any stickier.

That didn’t have any visible effect, so while I was at it, I also did a cap kit on the power supply to help future proof the game.
So, at about this point I got a reply from KLOV user Kaizen with an extremely helpful diagram of his readings of all the logic chips on a functional Space Invaders motherboard. The layout wasn’t exactly the same as my Space Invaders Deluxe, but only a couple chips are in different locations so I was still able to compare. The problem was, I didn’t have a spare power supply or monitor handy to rig up a test bench.
While I pondered setting that up, I did some cleaning of the cabinet’s display area, which was full of dead spiders and dust from being forgotten in a building for who knows how long. The marquee area had a big “NO SMOKING” sticker on it, obviously necessary because of how horribly marred and burnt by ash the control panel had become.

A tragedy.
The monitor overlay and mirror are in very nice shape aside from the dust.
The burn-in is unfortunate but super cool at the same time.

I also cleaned up the tarnish on the ROMs while I was at it.

I wonder why this one is an EPROM instead of a Mask ROM like all the others.
They all used to have labels to show which socket they went into but H is the only one that survived. I wonder if this is actually from the factory though since it’s so handwritten.

Well, the game sat around for about another year before I was able to get back around to it. What spurred me into finishing the repairs was that I now had an extra power supply due to another project, so I was able to rig up a test connector inspired by The Defender Project and Elektron Forge.

Using my logic probe, I compared the state of each pin to what was on the diagram, which helped me to identify chips that were potential problems. Then after several hours of studying the motherboard schematics, since I am no electrical engineer, I traced the incorrect signals back to two possible chips.

I took a guess as to which one might be causing the other to malfunction, and my first guess was wrong. However, my second guess was on the money: An SN7416N at location E7 on the board.

Partially desoldered in this photo.

This is a counter chip that I believe divides the clock signal into other frequencies that are then used by other components on the board. Instead of performing its prescribed function and pulsing at 120Hz and 480Hz, this chip had several pins stuck high, making other chips on the board freeze in an inoperative state. Once that chip was replaced, the board booted up.

However, there was still a problem. The invaders seemed to be leaving afterimages of themselves on the screen whenever they moved closer to the player.

I initially thought this was a RAM error, and the version I had on hand of the Space Invaders Test ROM seemed to agree with me. But that version was known to initialize the RAM test incorrectly, and thanks to advice from blinddog and Lurch666 I was able to nail down the real cause of the problem: A bad 74175 chip on the bit shifter.
The bit shifter is an ancillary piece of hardware that is responsible for the movement of the invaders on the screen because the CPU is too slow to handle moving them while keeping track of the rest of the game. If the shifter is malfunctioning, it can cause errors like this. It can also apparently cause the game to end prematurely when all the aliens decide to rush you at once after you’ve been playing for a few seconds. I got lucky because the 74175 chips are fairly easy to find, but the AMD 2510s (which are controlled by the 74175s) on the right side of the board are not so common. I replaced both 74175s because there’s not a really good way to tell which one is bad while they’re in circuit.

One of the two chips in the upper left was to blame for my shifting woes.

Now, while I was figuring this out, I still had some cabinet maintenance to do. At some point in the distant past, the original white blacklight in the cabinet was replaced with a regular purple blacklight. This massively dims the illumination behind the playfield, rendering the moon base diorama almost invisible.

By carefully reaching behind the monitor area, I was able to remove the old light from its fixture and replace it with the correct one. After that, I had a good picture on a game that played properly.

I’m still in awe of how this simply engineered color design works so well. The band of yellow on the monitor fits perfectly with the atmospheric glow in the background.

But the party wasn’t over yet!
There were two things left to fix up: The control panel and the marquee.
The marquee was easy. All of the original #1895 automotive bulbs had long since burned out, but my local lighting store (where I also got the white blacklight) had some #57 bulbs which are almost exactly the same. I got 10 for a whopping 16ยข apiece.

They had been there for a while.
Behind the marquee plex.
Hello, spider carcass.

There was only the control panel to fix now. I ordered a replacement CPO from Phoenix Arcade because they seemed to have the best reproduction, and it did not disappoint.

Thus began the arduous task of removing the old overlay. The silver stuff under the original overlay isn’t paint; it’s actually the original adhesive backing.
I removed the hardware from the control panel and went out to give it a good scrubbing before dunking everything in Evaporust for a night. I really want to get new #8 carriage bolts for this but no one locally keeps them in stock, so I haven’t gotten around to ordering them yet.

Gross.
Time to get less gross.
And then, even less gross, along with all the button hardware.

After quite a lot of scraping and pulling, I removed all of the old adhesive. Underneath there were some really trippy patterns that I assume were caused by something spilling underneath the parts where the old overlay had broken off.

In order to get maximum adhesion for the new overlay, I sanded down the old paint and re-coated it with new black paint.

By carefully aligning the new screw holes and slowly peeling the backing on the adhesive, I was able to line up the new overlay without too much trouble. Then I screwed in all of the hardware and buttons. I also reinstalled the T-molding on the front after it had a nice scrub in the sink. Now the control panel was ready to finally reinstall in the cabinet.

Towels to prevent scratching of the shiny new overlay.
Incredible!

I still need to scrub off the T-molding on the sides of the cab, but the major parts of this restoration are done. I’m quite pleased with how it turned out!

Posted in: Arcade, Hardware Mods/Repairs / Tagged: arcade, midway, repair, space invaders, taito

Custom SCART switcher problems

December 16, 2018 3:16 pm / Leave a Comment / Chupperson

I like Ben Heck’s idea for custom a AV switch, but the CBT3244 bus switch chips don’t have enough bandwidth for analog signals. Loud audio clips and bright video blanks out. I’ve just had to go back to manually plugging in one SCART cable at a time (everything is RGB now) unless I can find a method that allows this many inputs without losing quality. It seems like using a method designed more with these issues in mind is much more complicated and maybe out of my realm of expertise.

I promise, it isn’t dangerous.
Posted in: Uncategorized

Super Scope Eye Protector Replacements Now Available

April 7, 2018 11:04 pm / 8 Comments / Chupperson

3D printed replacement eye protectors for the Super Scope are now available in my eBay listings.

Posted in: 3D Printing, Hardware Mods/Repairs, Nintendo

TurboGrafx / PC Engine HuCard Trays Up for Sale!

May 13, 2017 1:02 am / Leave a Comment / Chupperson


They’ve been a while coming but are finally here! I now sell replacement trays for TurboGrafx-16 and PC Engine games. These are designed to fit in a standard jewel case and allow you to store your games as you would in their original cases. You can even print art for the back to simulate the original spine sticker and fit it underneath the tray. Check them out in my eBay items for sale.

Posted in: 3D Printing

Streetlight Moon

March 31, 2017 10:34 pm / Leave a Comment / Chupperson


Posted in: Uncategorized

Post Navigation

1 2 3 … 6 Next »
Follow on Instagram

Categories

  • 3D Printing
  • Arcade
  • awards
  • Films
  • Game Controllers
  • Hardware Mods/Repairs
  • Music
  • Nintendo
  • Sega
  • Uncategorized

nav

mine
Composition blog
Game collection
Game Music collection
Pictures!
Photos
Weird Stuff
Movies
YouTube
Audio

specials
How to Pwn
Stuff I Have Noticed

chup
Information
Products
Old Sketches
Chup ...The Font

KoC
Kings of Control

Smash
Snapshots

log
late night

linky
homunkulus
The Mushroom Kingdom
Hosted By


All content ©2004-2021 Matthew McCulloch, except where noted.
© Copyright 2022 - Chupnet
Infinity Theme by DesignCoral / WordPress